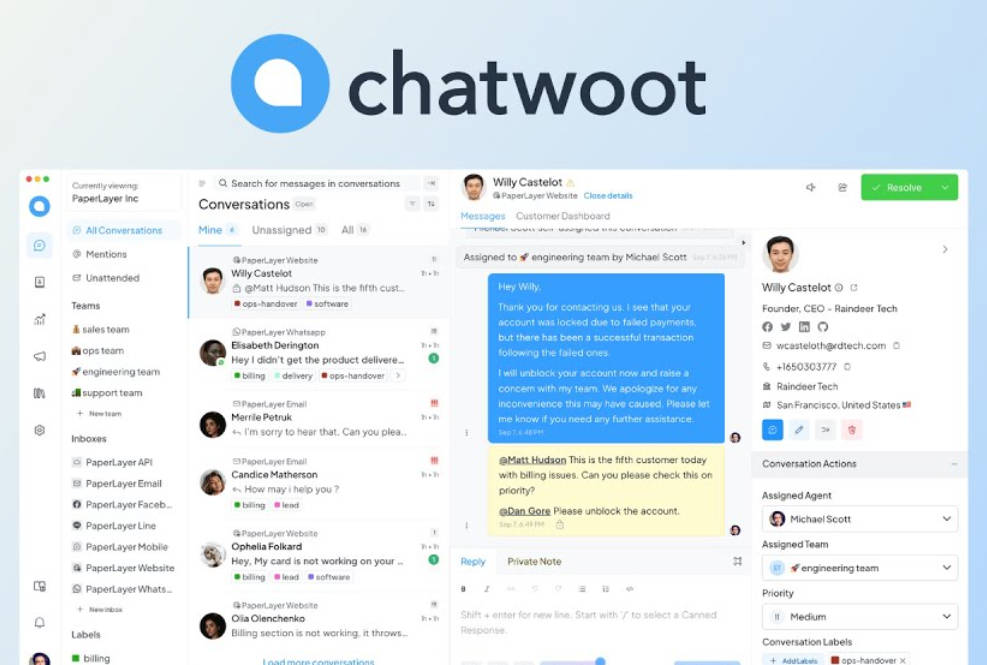

![图片[1]-使用Docker搭建Chatwoot客服系统,访客消息推送给TG Bot-坤哥资源](https://guankan.tk/wp-content/uploads/2025/07/chatwoot_webchat_12.png)
前提条件
Linux服务器安装好 Docker 和 docker-compose,申请一个Telegram机器人
Docker 安装教程:https://guankan.tk/529/
开始搭建Chatwoot
一,创建并进入目录
mkdir -p /root/chatwoot
cd /root/chatwoot
二,下载2个配置文件
wget -O .env https://raw.githubusercontent.com/chatwoot/chatwoot/develop/.env.example

wget -O docker-compose.yaml https://raw.githubusercontent.com/chatwoot/chatwoot/develop/docker-compose.production.yaml
三,配置.env环境变量,修改以下几个必要的内容,其它设置可忽略
SECRET_KEY_BASE=
可以在服务器上运行 openssl rand -base64 32 获得生成的随机字符串,然后输出上面的变量中

FRONTEND_URL=
网站域名,例如:https://chat.baidu.com

REDIS_PASSWORD=
POSTGRES_PASSWORD=
两个密码随便输入

FORCE_SSL=true
强制开启SSL,确保手机APP中消息图片显示正常
四,修改docker-compose.production.yaml
只需要修改3个地方:POSTGRES_DB=
POSTGRES_PASSWORD=
去掉 redis:中的端口
version: '3'

services:
  base: &base
    image: chatwoot/chatwoot:v4.10.1
    env_file: .env ## Change this file for customized env variables
    volumes:
      - storage_data:/app/storage

  rails:
    <<: *base
    depends_on:
      - postgres
      - redis
    ports:
      - '127.0.0.1:3000:3000'
    environment:
      - NODE_ENV=production
      - RAILS_ENV=production
      - INSTALLATION_ENV=docker
    entrypoint: docker/entrypoints/rails.sh
    command: ['bundle', 'exec', 'rails', 's', '-p', '3000', '-b', '0.0.0.0']
    restart: always

  sidekiq:
    <<: *base
    depends_on:
      - postgres
      - redis
    environment:
      - NODE_ENV=production
      - RAILS_ENV=production
      - INSTALLATION_ENV=docker
    command: ['bundle', 'exec', 'sidekiq', '-C', 'config/sidekiq.yml']
    restart: always

  postgres:
    image: pgvector/pgvector:pg16
    restart: always
    ports:
      - '127.0.0.1:5432:5432'
    volumes:
      - postgres_data:/var/lib/postgresql/data
    environment:
      - POSTGRES_DB=chatwoot_production
      - POSTGRES_USER=postgres
      # Please provide your own password.
      - POSTGRES_PASSWORD=与env密码保持一致

  redis:
    image: redis:alpine
    restart: always
    command: ["sh", "-c", "redis-server --requirepass \"$REDIS_PASSWORD\""]
    env_file: .env
    volumes:
      - redis_data:/data

volumes:
  storage_data:
  postgres_data:
  redis_data:
五,准备数据库
docker compose run --rm rails bundle exec rails db:chatwoot_prepare六,启动服务
docker compose up -dNginx 反向代理
最后,放行你的3000端口,使用Nginx反向代理http://127.0.0.1:3000 ,然后修改配置文件,保存后,访问域名注册账号就能正常使用了
#PROXY-START/

# 让 ActiveStorage 图片能在 App 中正确显示
location ^~ /rails/active_storage/ {
    proxy_pass http://127.0.0.1:3000;
    proxy_http_version 1.1;
    proxy_set_header Host $host;
    proxy_set_header X-Forwarded-Proto https;  # ✅ 固定为 https(关键)
    expires 1h;
    add_header Cache-Control "public, immutable";
}

# 主路由
location ^~ / {
    proxy_pass http://127.0.0.1:3000;
    proxy_http_version 1.1;
    proxy_set_header Host $host;
    proxy_set_header X-Real-IP $remote_addr;
    proxy_set_header X-Forwarded-For $proxy_add_x_forwarded_for;
    proxy_set_header REMOTE-HOST $remote_addr;
    proxy_set_header Upgrade $http_upgrade;
    proxy_set_header Connection $connection_upgrade;

    # ✅ 固定为 https,防止 Chatwoot 因 FORCE_SSL 检测到 http 而重定向
    proxy_set_header X-Forwarded-Proto https;

    add_header X-Cache $upstream_cache_status;

    # 静态资源缓存策略
    set $static_fileVxcPspob 0;
    if ($uri ~* "\.(gif|png|jpg|css|js|woff|woff2)$") {
        set $static_fileVxcPspob 1;
        expires 12h;
        add_header Cache-Control "public, immutable";
    }

    if ($static_fileVxcPspob = 0) {
        add_header Cache-Control no-cache;
    }
}

#PROXY-END/
修改界面语言为中文
左下角⚙️⇨ Account Settings⇨ Site language⇨ 选择为中文⇨ Update settings
创建网站会话
左下角⚙️⇨ 收件箱⇨ 添加收件箱⇨ 选择通道:Website ⇨ 填写资料⇨ 将最后一步的JS代码粘贴到你的网站中
![图片[2]-使用Docker搭建Chatwoot客服系统,访客消息推送给TG Bot-坤哥资源](https://guankan.tk/wp-content/uploads/2025/07/dd1-09.jpg)
将网站访客消息推送给Telegram Bot
![图片[3]-使用Docker搭建Chatwoot客服系统,访客消息推送给TG Bot-坤哥资源](https://guankan.tk/wp-content/uploads/2025/07/Snipaste_2025-07-31_20-55-27.jpg)
将网站访客消息实时推送给手机APP
![图片[4]-使用Docker搭建Chatwoot客服系统,访客消息推送给TG Bot-坤哥资源](https://guankan.tk/wp-content/uploads/2025/07/IMG_5148.jpg)
付费阅读
温馨提示:本文最后更新于2026年1月28日18时51分,某些文章资源具有时效性,若内容或链接失效,请在下方评论区留言反馈。
© 版权声明
THE END


暂无评论内容